timages-in-terminal.txt - monochromatic - monochromatic blog: http://blog.z3bra.org
HTML git clone git://z3bra.org/monochromatic
DIR Log
DIR Files
DIR Refs
---
timages-in-terminal.txt (7148B)
---
1 # Images in terminal
2
3 28 January, 2014
4
5 I am a huge fan of the terminal. Really. 90% of the magic I realize on my
6 computer is through a terminal: IRC, text editing, ,e-mails, file managing,
7 package managing, developpement, even web browsing sometimes !
8
9 But the terminal lack one thing: **image rendering**.
10
11 I have search a way to display images in the terminal for a looooong time now,
12 and after digging through fbi, fbterm, and obscure graphical drivers, I finally
13 found my goldmine.. I stumbled upon
14 [this picture](http://www.nongnu.org/ranger/screenshots/w3mimgpreview.png)
15 taken from [this website](http://www.nongnu.org/ranger/). Ranger. It's a
16 text-based file manager (that's cool bro'), but the interesting point sits in
17 the "dependencies" section:
18
19 > • w3m for previewing images in "true color".
20
21 [w3m](http://w3m.sourceforge.net). That was my answer.
22
23 ## the package
24
25 w3m is a text-based web browser. It means that you can use it to browse the web
26 from within your terminal (good stuff!). There are many like it (lynx, links,
27 elinks, edbrowse,..), but this one is different, as it acts more like a
28 point'n'click software than a CLI app.
29
30 w3m uses gpm, a tool that let you use your terminal cursor like a mouse, moving
31 it character by character. Anyway, that's not the point here. Let's go back to
32 image viewing! w3m has the particularity to render images in your terminal,
33 and it is pretty good at it! The problem was to find out **HOW**. I browsed the
34 manpage many, many times, searching for keywords like <q>image</q>,
35 <q>preview</q>, <q>gimme my f\*\*cking image rendering, damn software!</q>. Every
36 usefull keyword I could find. **Nothing**.
37
38 ## the pursuit
39
40 A few minutes (when all the buckets were fullfilled with my tears), I finally
41 tough: <q>Use the source, z3bra</q>. That's how I installed ranger.
42
43 Ranger is written in python. And if it uses w3m to render images, I would find
44 the tool it uses to do so. Here is how I managed to find it:
45
46 $ pacman -Ql ranger | grep -E 'image|img|w3m|picture|preview'
47 ranger /usr/lib/python3.3/site-packages/ranger/ext/__pycache__/img_display.cpython-33.pyc
48 ranger /usr/lib/python3.3/site-packages/ranger/ext/__pycache__/img_display.cpython-33.pyo
49 ranger /usr/lib/python3.3/site-packages/ranger/ext/img_display.py
50
51 $ grep 'w3m' /usr/lib/python3.3/site-packages/ranger/ext/img_display.py
52 ...
53 W3MIMGDISPLAY_PATH = '/usr/lib/w3m/w3mimgdisplay'
54 ...
55
56 **HOORAY!** A binary ! Next step will be to understand how to make it render
57 images in the terminal..
58
59 ## the trials
60
61 Obviously, running `w3mimgdisplay --help` would've been too easy.. But I
62 finally managed to understand a few things using the ranger source I just
63 found, and
64 [this thread](https://www.mail-archive.com/mutt-users@mutt.org/msg34447.html).
65 Here is the idea: w3mimgdisplay reads commands from stdin, and draws something
66 on your terminal, pixel by pixel.
67
68 w3mimgdisplay commands are numbers from 0 to 6, and some commands take
69 additionnal parameters.
70 In the w3m tarball, you can find this:
71
72 w3mimgdisplay.c
73
74 /*
75 * w3mimg protocol
76 * 0 1 2 ....
77 * +--+--+--+--+ ...... +--+--+
78 * |op|; |args |\n|
79 * +--+--+--+--+ .......+--+--+
80 *
81 * args is separeted by ';'
82 * op args
83 * 0; params draw image
84 * 1; params redraw image
85 * 2; -none- terminate drawing
86 * 3; -none- sync drawing
87 * 4; -none- nop, sync communication
88 * response '\n'
89 * 5; path get size of image,
90 * response "<width> <height>\n"
91 * 6; params(6) clear image
92 *
93 * params
94 * <n>;<x>;<y>;<w>;<h>;<sx>;<sy>;<sw>;<sh>;<path>
95 * params(6)
96 * <x>;<y>;<w>;<h>
97 *
98 */
99
100 Here is the _params_ interpreted on the mutt mail list:
101
102 > n - This is used when displaying multiple images
103 > x - x coordinate to draw the image at (top left corner)
104 > y - y coordinate to draw the image at (top left corner)
105 > w - width to draw the image
106 > h - height to draw the image
107 > sx - x offset to draw the image
108 > xy - y offset to draw the image
109 > sw - width of the original (source) image
110 > sh - height of the original (source) image
111
112 I now have a better idea on how the protocol works. Now, by crossing it with
113 the ranger source, I ended up with this line:
114
115 echo -e '0;1;0;0;200;160;;;;;ant.jpg\n4;\n3;' | /usr/lib/w3m/w3mimgdisplay
116
117 **BOOM !** [It works!](http://chezmoicamarche.com)
118 [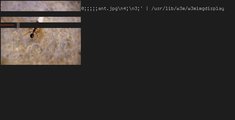](http://pub.z3bra.org/monochromatic/img/w3mimgdisplay-crap.jpg)
119 *The result of the previous command. Our picture drawn in
120 200x100px, at offset +0+0 in the terminal. I'm sure you're already trying it
121 ;)*
122
123 ## the wrapping
124
125 Okay, we can now display an image in the terminal, at the offset and size we
126 want. Let's wrap it up in a script, to be more adaptive! We will need some
127 tools to help us here. Feel free to search by yourself, as an exercise. Here is
128 the script I came with:
129
130 #!/bin/bash
131 #
132 # z3bra -- 2014-01-21
133
134 test -z "$1" && exit
135
136 W3MIMGDISPLAY="/usr/lib/w3m/w3mimgdisplay"
137 FILENAME=$1
138 FONTH=14 # Size of one terminal row
139 FONTW=8 # Size of one terminal column
140 COLUMNS=`tput cols`
141 LINES=`tput lines`
142
143 read width height <<< `echo -e "5;$FILENAME" | $W3MIMGDISPLAY`
144
145 max_width=$(($FONTW * $COLUMNS))
146 max_height=$(($FONTH * $(($LINES - 2)))) # substract one line for prompt
147
148 if test $width -gt $max_width; then
149 height=$(($height * $max_width / $width))
150 width=$max_width
151 fi
152 if test $height -gt $max_height; then
153 width=$(($width * $max_height / $height))
154 height=$max_height
155 fi
156
157 w3m_command="0;1;0;0;$width;$height;;;;;$FILENAME\n4;\n3;"
158
159 tput cup $(($height/$FONTH)) 0
160 echo -e $w3m_command|$W3MIMGDISPLAY
161
162 Let's see the rendering...
163 [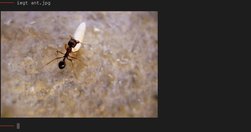](http://pub.z3bra.org/monochromatic/img/w3mimgdisplay-good.jpg)
164
165 The script draws the image depending on the terminal size (width AND height),
166 and put the cursor after the image (exactly 2 lines after).
167 You might want to adapt it to your own case, as the character height and width
168 is hardcoded.
169
170 Aaaaaaaaand it's cool !
171
172 ## the end
173
174 There you are. You have a tool to preview images in your terminal, in an easy
175 way. The dependency is not huge, and you can script it the way you want.
176
177 I hope you learnt a few things here, like tips to grok softwares, understand
178 libs/protocols, or at least, the w3mimg protocol. My script is not perfect,
179 because I have no idea how one can get the current cursor line and such. so if
180 you have any improvement or idea, I'll be glad to modify my script and add your
181 name :)
182
183 _Side note:_ w3m can't render images in urxvt, if the depth is 32. That means
184 that you can't render images on a transparent background. Be sure that you
185 comment the line `URxvt*depth: 32` in your `~/.Xresources`.
186
187 **That's all, folks!**